
If you are like me, you emerged from your collegiate experience with a broad array of fundamental tools in structural design that, hopefully, armed you adequately for your chosen career. I recall finishing my bachelor’s degree and having a skill set that, in retrospect, might be described as “barely sufficient”. With this statement, I do not mean to diminish the quality of my education, nor the dedication or expertise of excellent professors. I simply mean that a four-year college experience laced with a generous dose of liberal arts education requirements barely compares to the experience and learning that take place in actual practice. Among the skills that I gained as an undergraduate were the basics of reinforced concrete design, including beams and columns. I eventually came to understand that the concepts that pertain to these elements also permeate nearly every aspect of reinforced concrete design, from footings to shear walls. I have also come to understand that, like many other materials, there are simplified approaches for reinforced concrete design. Although they should not become the final basis of design, they can serve as effective tools to corroborate more detailed calculations or to estimate geometries, sizes and proportions as part of a preliminary or schematic design. This article seeks to address and elaborate upon a few of the simplified methods commonly used for reinforced concrete.
First, consider the familiar As~Mu/4d approach that is commonly used in the design of reinforced concrete beams. Quite simply, the required area of steel is approximately equal to the factored moment (in kip-feet) divided by 4d, where d is the effective depth from the extreme compression fiber to the centroid of the tensile reinforcement (in inches). When sizing a beam, it is advisable to start with the ACI provisions for span-to-depth ratios. You may recall that for a simply supported beam having a total height (h) not less than span/16, deflection calculations may be omitted. This is good precedent for beginning a beam design. As for the width, good proportioning of sizes will often show that widths between one-half and two-thirds of the depth are often appropriate.
Regarding the reinforcement, contemporary texts offer elaborate approaches for determining how much steel to use, and computers can make the trial-and-error process relatively quick and painless. Examination of the basic equations,
a = As fy/0.85 f ‘c b
and
[pmath]phi[/pmath]Mn = NAs fy(d-a/2),
shows that a second-order polynomial can be developed for which the required area of steel (As) can be solved by substituting Mu for [pmath]phi[/pmath]Mn. The problem is that this is tedious and yields an exact result that is not necessarily pragmatic considering the discrete bar sizes available.
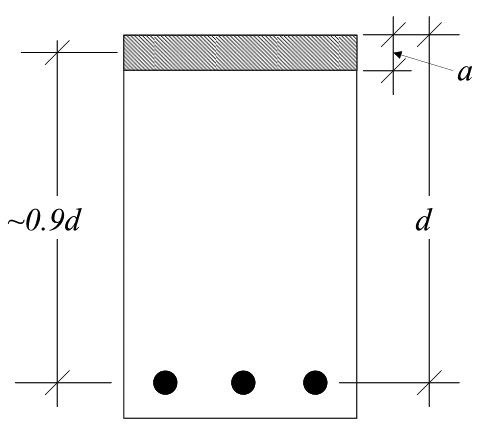
Figure 1
This is why the As~Mu/4d method is so useful. This equation is not typically found in modern concrete design textbooks, yet it is perhaps one of the most prolific approximations within structural engineering. Does it have a rational basis? One would assume that it must, because it always seems to work, provided that the beam dimensions are reasonable. If we make the simple yet rational approximation that the internal lever arm between tensile and compressive resultants in a concrete beam is equal to 90% of the effective depth (d), then the (d-a/2) component of the “exact” equation above simply becomes 0.9d (Figure 1). Assuming fy = 60 ksi since this is almost always the case, we now have a simple equation for approximate nominal flexural capacity:
[pmath]phi[/pmath]Mn = [pmath]phi[/pmath]As(60 ksi)(0.9d)
Now, substitute Mu for [pmath]phi[/pmath]Mn and convert from units of kip-feet to kip-inches by multiplying Mu by 12. Next, assign [pmath]phi[/pmath] = 0.9, which is usually the case unless reinforcing ratios become extremely high or the beam is unusually shallow, and we get the result:
As [pmath]{approx }{M_u(12)}/{0.9(60)(0.9d)} = {M_u}/{4.05d}[/pmath]
Hence the long-held approximation does have a rational basis.
What about column axial/flexural design? A knee-jerk reaction for many might be to open up a spreadsheet or some other automated tool. Before doing this, we might ask the following: What are the two most descriptive points on an interaction diagram? I believe that they are the points intersecting the x and y axes; in other words, the moment capacity when there is no axial load, and the axial capacity when there is no moment. Knowing what interaction curves will likely develop with respect to these points can be instructive.
So, how can we estimate these points without a bunch of tedious calculations? Start by looking at the moment capacity under zero axial load (i.e., the column behaves like a beam). If reinforcing ratios are relatively low (1% to 3%), then it stands to reason that bars in compression or near the neutral axis probably do not contribute much to flexural capacity. Consider an 18-inch square column with f’c = 4,000 psi and eight #7 vertical bars (about 1.5% steel) in a standard 3×3 pattern and 2.5 inches of cover to bar center. At zero axial load, the compression zone becomes relatively small, such that the neutral axis lies relatively close to the extreme compression fiber. Drawing upon this logic, we can conclude that the centroid of tensile forces for the reinforcement at the opposite side of the column is typically about two-thirds of the column thickness (h), which would be 12 inches in this example. Using this as the effective depth results in an approximate flexural capacity of 142 kip-feet. Note that this process may be done in reverse with the Mu/4d approach when starting from scratch.
Next, consider the axial capacity. We start by examining the column cross-section. We need to sum the capacity of the concrete and the steel; for simplicity, ignore the area of concrete replaced by the reinforcement since this is only 1% to 3% of the gross concrete area. Since the column is tied, we will use [pmath]phi[/pmath] = 0.65. Adapting the ACI column equation to these ideas yields:
[pmath]phi[/pmath]Pn ≈ 0.65(0.80)(0.85 f ‘c Ag+ fy As) ≈ 0.44 f ‘cAg + 0.52 fy As
Applying the parameters of our 18-inch square column yields [pmath]phi[/pmath]Pn ~ 720 kips. I now have two points on the interaction diagram that I can use to make an educated guess of the interaction diagram shape, which can be compared with the interaction diagram based on the provisions of ACI 318 (Figure 2). Although there are some differences, the approach yields a speculative but conservative interaction curve that is reasonably close to the “actual” curve. This was achieved with only two fundamental calculations, rather than the dozens or perhaps hundreds of calculations necessary to develop the complete interaction curve.
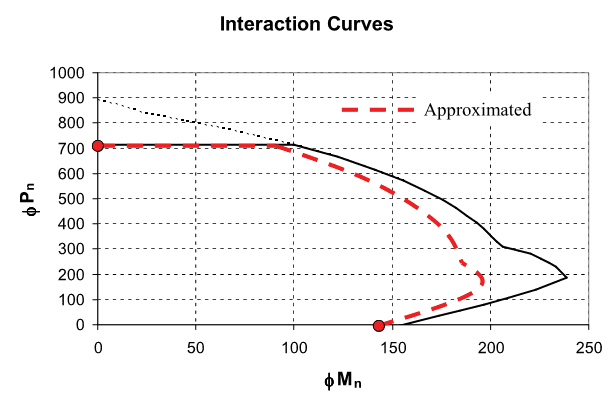
Figure 2
The approximate interaction curve is established using the aforementioned calculations as a basis and then superimposing what may be deemed a “standard” interaction curve shape, scaled to match the two previously determined points. This curve should not be used where a high degree of accuracy is needed. For instance, if a point representing simultaneous bending and axial loads (Mu, Pu) falls directly on the approximate curve, more refined calculations or a more conservative design should be considered.
Upon validating a simplified method such as this, it becomes possible to adapt it to other design scenarios. In particular, in-plane flexural design of concrete shear walls can be particularly tedious. While redundancy precludes elaborating upon a simplified method for concrete shear wall flexural design, it is sufficient to say that most concrete shear walls are not loaded anywhere near their peak axial capacities. In fact, axial loads on shear walls are often so low that they can simply be characterized as vertical beams. Considering the typical interaction curve, it is no stretch to rationalize that accounting for axial load will likely increase flexural capacity, at least to a point. In that sense, simplified methods (like Mu/4d) to determine approximate areas of boundary element steel can be useful and are likely to be conservative.▪
This article is intended for structural engineering practitioners and other design professionals seeking to expand their repertoire of fundamental skills and tools. The suggested techniques and simplified methods are derived from general principles of concrete design and relevant ACI code provisions. These procedures should not be used for final structural design, but may serve well as preliminary estimates or for verification of final design. Assurance of code compliance remains the responsibility of the Structural Engineer of Record.
A similar article was published in the SEAU Newsletter (Fall 2012). It is reprinted with permission.