
So maybe this is not exactly a rendition of Fight Club, but engineers often wonder which masonry analysis method comes out better in a head-to-head duel. Historically, masonry has been designed using allowable stress design (ASD). Strength design (SD) was added to the TMS 402 masonry code in 2002 and thus has only been in the code for about 15 years. Designers often ask which method is preferable – ASD or SD? Let’s explore this question.
This article compares the design methods for beams, bearing walls, and shear walls using the 2013 TMS 402 Building Requirements for Masonry Structures code.
Round 1: Beams
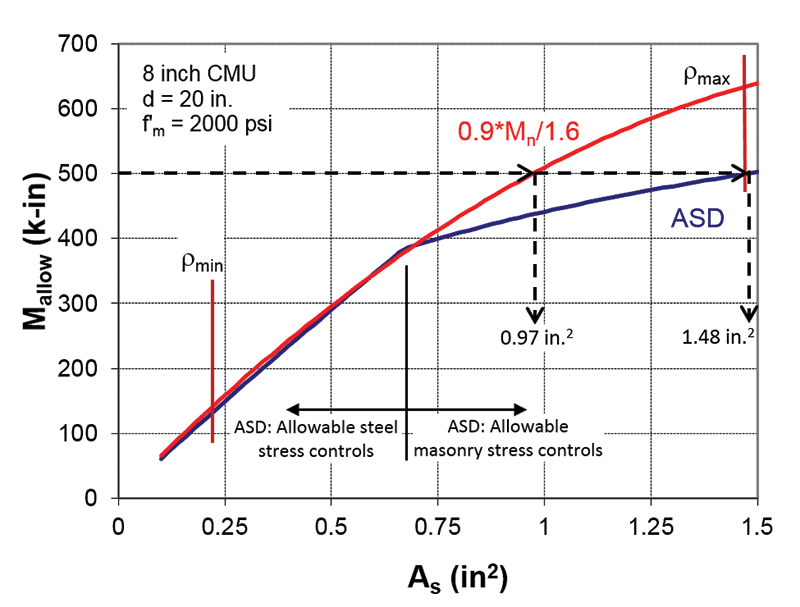
Figure 1. Comparison of ASD and SD for a masonry beam.
Figure 1 compares the allowable moment in a masonry beam as a function of the area of reinforcement and is the key to comparing the two design methods. In this figure, the nominal moment from strength design has been divided by an assumed load factor of 1.6 to obtain an “allowable” moment so the design methods can be compared. For smaller amounts of reinforcement, the allowable steel stress controls in ASD, so ASD and SD require approximately the same amount of reinforcement. At higher amounts of reinforcement, the allowable masonry stress controls the design, and the graph becomes quite flat. The reinforcement is not being used efficiently. For example, using Figure 1 and a design moment of 500 k-in, SD would require 0.97 square inches of reinforcement, while ASD would require 1.48 square inches of reinforcement or 50% more than SD. Even though the allowable masonry stress is controlling the design, the failure would still be a ductile failure; the balanced reinforcement where the masonry crushes as the reinforcement yields is 1.78 square inches. This trend holds for combined axial and flexure (interaction diagrams). When the allowable steel stress controls the ASD design, ASD and SD are reasonably similar. When the allowable masonry stress controls the design, ASD becomes quite conservative.
The above comparison was based on an assumed load factor of 1.6. This would be appropriate for non-bearing-walls under out-of-plane load, where the load would be either wind or seismic. For beams, much of the load is often dead load. SD has the advantage in this case, due to the smaller dead load factor of 1.2. For example, if half the load were dead load, SD requires only 75-80% of the reinforcement as ASD, even with the allowable steel stress controlling. For round 1 of the cage fight, beams, the advantage is given to SD.
Round 2: Bearing Walls
So, going into Round 2, SD is ahead of ASD by almost a knock-out. However, let’s not count ASD out just yet. For most masonry bearing walls, the allowable steel stress will control the ASD design. No second-order, or P-delta analysis is required with ASD. When the allowable stresses were recalibrated in the 2011 TMS 402 code as a result of the removal of the one-third stress increase, an allowable steel stress of 32 ksi was chosen for Grade 60 steel rather than 36 ksi (0.6fy) in order to avoid having to perform a second-order analysis in ASD. By contrast, SD requires a second-order analysis of all bearing walls, no matter how small the height/thickness ratio or how small the axial load. SD also requires a deflection check under allowable stress level loads, while there is no deflection check in ASD. Due to the allowable steel stress usually controlling, and the primary load being wind or seismic, the difference in required reinforcement using ASD and SD is usually less than 5%. The two design methods give approximately the same amount of required reinforcement, but ASD design is much simpler due to not requiring a second-order analysis. (Note that, in the future, the TMS 402 Code Committee is considering adding a trigger to SD design and only requiring a second-order analysis for truly slender walls.) For round 2 of the cage fight, bearing walls, the advantage is given to ASD.
Round 3: Shear walls
Heading into this third round, ASD and SD have both scored a win. So, what happens with shear wall design? Three aspects of shear walls are considered to answer this: flexure (overturning), shear, and special reinforced shear walls.
With regard to flexure, SD has a distinct advantage over ASD whenever there is distributed reinforcement. Most, if not all, intermediate reinforcement in tension will be at yield with SD. Although the smaller lever arm makes the intermediate reinforcement less effective than reinforcement at the ends of the wall (jamb steel), the intermediate reinforcement still contributes significantly to the flexural capacity. With ASD, the distributed reinforcement not only has a smaller lever arm, but it will also have a smaller stress due to stress being directly proportional to strain in ASD. For example, in one trial design of a 16-foot long shear wall that had a high in-plane load, ASD required a #6 bar in each of the three end cells and #6@40 inches for the intermediate bars. Designing the same wall using SD required a #5 bar in each of the two end cells and #5@40 inches for the intermediate bars. The results of the trial design are shown as an interaction diagram in Figure 2. SD required only 55% of the reinforcement that was required using ASD.
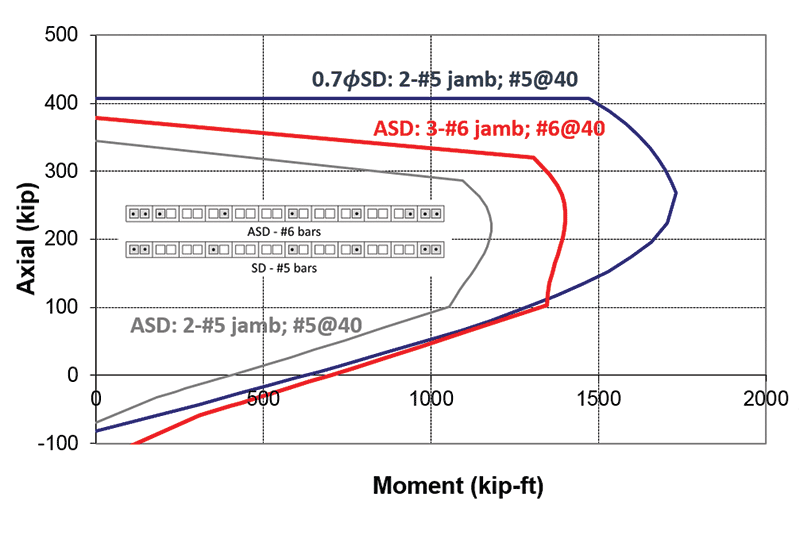
Figure 2. Shear wall with distributed reinforcement.
There was a major change to the shear provisions in ASD recalibration effort done in the 2011 TMS 402 Code. As the SD shear design procedures have been shown to be an excellent predictor of shear strength of fully grouted shear walls, the ASD provisions were harmonized with the SD provisions. The ASD provisions are written in terms of stress instead of force and have a factor of safety of 2 (approximate load factor of 1.6 divided by a shear strength reduction factor of 0.8). Thus, the amount of shear reinforcement required in shear walls will be approximately the same in ASD and SD.
Special reinforced masonry shear walls have shear capacity design provisions. These provisions require an increase in shear strength to minimize the probability of a brittle shear failure. In SD, the design shear strength (φVn) is required to be greater than the shear corresponding to 1.25 times the nominal flexural strength, Mn (increases shear at least 1.39 times), except that Vn need not be greater than 2.5Vu (doubles shear). In ASD, the shear is required to be increased by 1.5 and the contribution of the masonry to the shear strength is reduced by a factor of 2. Although the intent in developing the code provisions was that both methods would require approximately the same shear reinforcement, SD typically requires less shear reinforcement in special reinforced masonry walls. For the trial design mentioned above and designed as a special reinforced shear wall, the required shear reinforcement was #5@16 inches for ASD. For SD, there was barely any shear reinforcement required, #5@269 inches. However, it should be noted that the prescriptive reinforcement (at least 0.0007 of the gross area of the wall) and spacing limits (¹⁄3 the height, ¹⁄3 the length, or 48 inch for running bond) will often control the horizontal reinforcement in special shear walls. Thus, in the trial design, the horizontal reinforcement was required to be #5@40 inches in SD. Except for highly loaded shear walls, the prescriptive requirements generally result in the same horizontal reinforcement whether using ASD or SD.
There are two other differences in the design of shear walls with ASD and SD. One is the maximum reinforcement requirements, which are to ensure ductility and minimize the probability of toe crushing. In ASD there are only maximum reinforcement requirements for special walls, while in SD there are maximum reinforcement requirements for all reinforced shear walls (ordinary, intermediate, and special). The SD maximum reinforcement requirements tend to be more onerous. This has caused some designers to use ASD instead of SD. However, using ASD results in even more reinforcement being required in the wall, defeating the purpose of the maximum reinforcement requirements.
The other difference is that SD calls for the horizontal bars needed for shear reinforcement to be bent around the edge of the vertical reinforcing bar with a 180° hook, while ASD is silent and presumably allows a 90° hook with the hook extension being turned down in the cell of the wall. Because of this, some designers have indicated a preference for ASD, citing the potential difficulty with 180° hooks. However, if the 180° is turned, so the hook lies in a 45° plane from the horizontal, there are usually no construction problems.
 To recap, SD requires much less flexural (overturning) reinforcement and requires less shear reinforcement for special reinforced masonry shear walls. Although the maximum reinforcement requirements for SD are more stringent, the recent increase in f’m from 1500 psi to 2000 psi for Type S mortar and minimum strength CMU units has made the maximum reinforcement provisions less likely to control. For round 3 of the cage fight, shear walls, the advantage is given to SD.
And the winner is… Strength Design, but in a split decision.
To summarize, SD offers several advantages over ASD and can result in more efficient designs. Designers are encouraged to consider using SD for the design of masonry structures.▪